|
|
Documentation
v3.4.0 |
|
OverviewThis document discusses many of the features that RetroBlit offers. Text is good, reading is good, but be sure to also check out the DemoReel example in the scene Assets/Demos/DemoReel/Scenes/DemoReel for some visual bliss and instant gratification. A Game From ScratchRetroBlit comes with a bare-bones game that you can use as a starting template. Please see Assets/MyGame/Scenes/MyGame Scene and the Assets/MyGame/Scripts/MyGame.cs source file. If you'd like to construct the starting point yourself, or are simply curious then follow these simple steps:
The Game LoopRetroBlit makes use of the classic almighty game loop, which every RetroBlit game uses by implementing the RB.IRetroBlitGame interface:
We will explore in detail what we can do in each of these methods in the remainder of this Features document. Fixed Frame RateRetroBlit runs the RB.IRetroBlitGame.Update at a fixed rate. The default rate is 60 FPS, but a custom rate can be set in RB.IRetroBlitGame.QueryHardware.
At any time you can query the FPS setting with RB.FPS, and you can also query the fixed interval between frames in seconds with RB.UpdateInterval, which is simply equivalent to 1.0f /RB.FPS. GraphicsNew Rendering PipelineAs you explore RetroBlit it's important to understand that for all practical purposes RetroBlit throws out the entire Unity rendering pipeline out the window, and replaces it with it's own rendering pipeline. This means that in terms of rendering what is not explicitly covered by RetroBlit will not be available. This includes Unity GUI, Unity Sprites, Meshes, and Animations. It helps to think of RetroBlit as an API you might have had if you were developing console games in the early 1990s. It is however possible to take the RetroBlit final render texture and incorporate it into any Unity Scene, see Taking Over Display. Pixel Perfect RenderingIt can be challenging to get pixel perfect rendering working in Unity. The camera has to be setup just right, texture parameters have to be set correctly, and when you're all done you may still encounter infuriating, and non-intuitive issues with pixels going missing, or some pixels being larger than others. RetroBlit takes care of all those issues with its own rendering framework, and includes changes to the Unity texture importer that take care of the texture setting details for you. All you have to do is set your desired destination resolution in the call to RB.IRetroBlitGame.QueryHardware like this:
You can change the RetroBlit display size at any time by calling the RB.DisplayModeSet method. If your native display or window resolution changes at run time then RetroBlit will scale its pixels appropriately, and possibly use letterboxing, but it will not automatically change the logical resolution of your game as defined by RB.DisplaySize. This may seem like a hindrance at first, but at the same time it is liberating to know that because the resolution will not change on you, all your game layouts and menus will also not be affected, and you can always expect the user to have the same field of view. If the requested resolution divides evenly into the displays native resolution then the result will be perfect, sharp pixels. However, if the resolution does not divide evenly into the displays native resolution then by definition each pixel cannot be the same size, and still fill the display. Pixels of varying sizes are visually jarring, and so to help with this issue RetroBlit will blend together pixel edges just enough to make the pixels seems like they are equal in size, without causing too much blurring. For example: Pixel size divides evenly into displays native resolution - The pixel scaling is perfect. Pixel size does not divide evenly into displays native resolution - Naive scaling results in pixels of varying sizes, just look at these, ridiculous, unacceptable, get outta here. Pixel size does not divide evenly into displays native resolution - RetroBlit smooth scaling gives an impression that the pixels are the same size, without overly blurring the image. Pixel StyleThe 1980s were a growing time for PC display technology. A lot of odd-ball video modes were developed, and not all of them thought that pixels should be square! To help emulate those systems RetroBlit has support for wide-pixels (effectively 2x1), and tall-pixels (1x2). You can set the desired pixel mode via RB.IRetroBlitGame.QueryHardware or later via RB.DisplayModeSet.
Wide-pixel format, each pixel is made of 2 x 1 rectangular pixels. Tall-pixel format, each pixel is made of 1 x 2 rectangular pixels. SpritesSprite SheetsRetroBlit allows you to setup multiple sprite sheets, and each sprite sheet may have different sprite sizes. You can setup a sprite sheet at any time, or simply do it ahead of time in your RB.IRetroBlitGame.Initialize implementation:
Once a sprite sheet is setup you can select it as the current sprite sheet with a simple call to RB.SpriteSheetSet as shown above. For your sprite sheets you should use a loss-less image format such as PNG. Sprite sheets can be any size supported by your target device and Unity. Some higher end mobile devices can comfortably support 4096x4096 textures, but if you're targetting a wide range of mobile devices it is advisable that you try not to exceed 2048x2048. Your sprite sheet files must be located somewhere under a Resources folder so that RetroBlit can find them. For other asset loading options see Asynchronous Asset Loading. Each sprite sheet can also have a SpriteGrid setup. A sprite grid defines a rectangular area within the sprite sheet that contains a grid of sprites of the same size. You can change the sprite sheet grid at any time, which allows you to have one sprite sheet with different sized sprites separated into different rectangular areas. When drawing sprites with RB.DrawSprite you can refer to sprites in a sprite grid by their index in the grid. It is also possible to draw from arbitrary rectangular region in a sprite sheet, see RB.DrawCopy. You should never have to worry about your texture settings in Unity, RetroBlit hooks into the texture import pre-processor and takes care of the settings for you. When you no longer need a particular sprite sheet you can free up resources with SpriteSheetAsset.Unload. Sprite PacksSprite sheets are great, and simple to use. However they can get unwieldly as your project grows because you will inevitably want to reorganize your sprite sheet, and everytime you do so you will have to update all the sprite indices, and all the source rectangles you were using in your game before. To get around this issue RetroBlit also supports sprite packs! A sprite pack is a special sprite sheet generated by RetroBlit out of individual sprite images. These sprite images are packed efficiently into a tightly packed sprite sheet. The resulting sprite pack lets you refer to individual sprites by their original sprite image name instead of indices or coordinates! With sprite packs you will not have to worry about organizing your sprite sheet! Creating a Sprite PackTo use a sprite pack you first have to create an asset that defines one! Sprite pack definition files are text files with the extension *.sp. These files define the folders containing your individual sprites, your output packed sprite sheet dimensions, and whether the empty space around the sprites should be trimmed. Here is an example:
Simple! Keep in mind that the SOURCE_FOLDER should point to a folder outside your Assets folder. This is important because we don't want Unity to put your individual sprite images into the games resources, we only want it to store the RetroBlit generated sprite pack image. SOURCE_FOLDER will be scanned recursively, and all sprite images found will be added to the sprite pack. Sprite packs only support .png images. The TRIM parameter should almost always be set to true. RetroBlit is aware of the trimmed empty space, and will offset any sprite drawing to replicate the empty space that it has trimmed in the sprite pack! However, there may be still be some rare scenarios in which you don't want the empty space around sprites to be trimmed. NOTE: Unity will not be able to automatically re-import/re-create your sprite packs when the source sprite images are changed. This is because your sprite images can, and should live outside of the Assets folder, and therefore will not be scanned by Unity for changes. When you make changes to your sprite pack be sure to re-import your sprite pack definition file inside of Unity to re-create the sprite pack with your new changes. Using a Sprite PackUsing a sprite pack is just as simple as using a normal sprite sheet. First you load it up, just like a normal sprite sheet:
... and that's it! You're ready to go. See the following drawing features for examples on how to draw with sprite packs. Note that the following examples all refer to sprite pack sprites with string names, strings can however generate garbage, and internally carry overhead as they have to be hashed to find the underlying sprite. Instead of strings all APIs that can handle sprite packs also allow you to refer to them by PackedSpriteID, which you can prefetch by calling RB.PackedSpriteID, or by PackedSprite, which you can get by calling RB.PackedSpriteGet. PackedSprite contains information on how the sprite was packed, and its source rectangle within the packed texture. In some cases this may be useful information, especially if you want to draw to the packed sprite texture. DrawingDrawing a sprite is simplicity itself. If you're experienced with Unity you may be used to creating GameObjects, and putting your sprites into the Scene tree. With RetroBlit you simply use the RB.DrawSprite inside of the RB.IRetroBlitGame.Render method. For example:
In this example a sprite at index 0 (the first cell in your sprite sheet) is drawn at position 100, 100. To help deal with large sprite sheets you may use RB.SpriteIndex to help you calculate the sprite index given the sprite column and row it appears in. Instead of drawing by sprite index, you may also copy arbitrary rectangular region from the sprite sheet like this:
This example copies a rectangular region from the sprite sheet starting a position 0, 0, 64 pixels wide, and 128 pixels high, to the position 100, 100 on the display. You may also use sprite packs to draw:
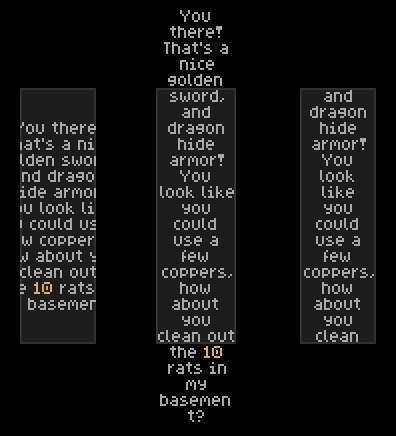
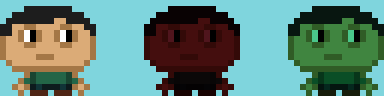
In this example we draw the sprite named Hero/Walk1 for current sprite pack. The name of this sprite relates to the source image it was created from, which in this case would have been *Hero/Walk1.png*. There are a few other method overloads to DrawSprite and DrawCopy that allow for scaling, rotation, and horizontal and vertical flipping. Have a look at the DemoReel example project, and the API Reference. Nine-Slice SpriteRetroBlit also supports nine-slice sprites. This kind of sprite is made out of 9 pieces, and can scale itself by repeating some of these pieces, while keeping others fixed. These sprites are often used for UI and dialogs.
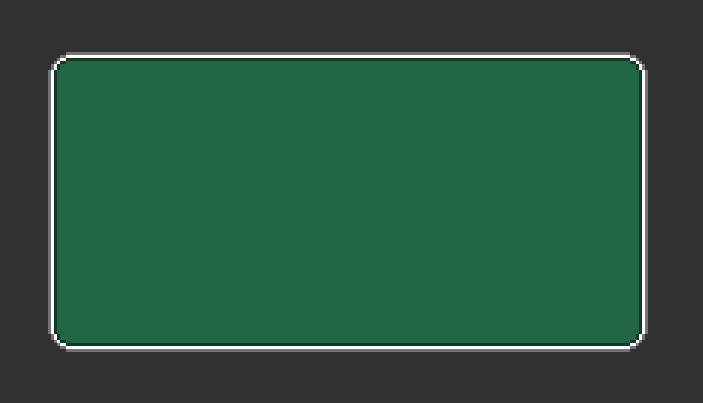
This large nine-slice sprite is made of these tiny pieces: 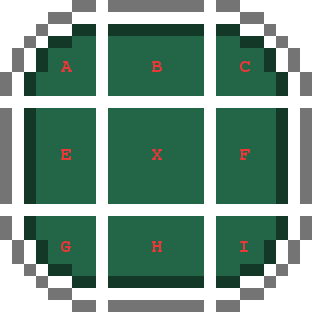 The pieces A, C, G, and I are always drawn in the corners of the nine-slice sprite. B and H are repeated horizontally. E and F are repeated vertically. Finally, X is repeated in both directions to fill the middle of the nine-slice sprite. For best results each of these groups of pieces should be the same height:
These groups should be the same width:
The center piece X can be any size. It is recommended that you don't make these pieces too small to limit the amount of times they have to be repeated to fill your nine-slice sprite. You might notice that this particular nine-slice sprite is symmetric. For convenience you could use this short-hand method instead to render it:
RetroBlit will simply mirror the remaining pieces of the nine-slice image. Finally, you may also draw a nine-slice image by using a sprite pack. Simply use the sprite names instead of Rect2i
PrimitivesIt can often be useful to draw geometric primitives, and RetroBlit allows you to do so very easily. There are methods for drawing pixels, rectangles, ellipses, triangles, and lines. For example:
These should be pretty self explanatory, with perhaps the exception of RB.DrawEllipseInvertedFill which fills the area outside of the ellipse rather than inside. 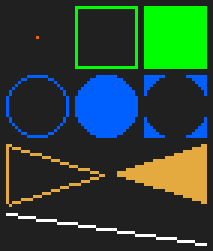 Textured LinesRetroBlit can also draw more fancy lines. It's possible to draw lines with variable thickness, and also textured lines! 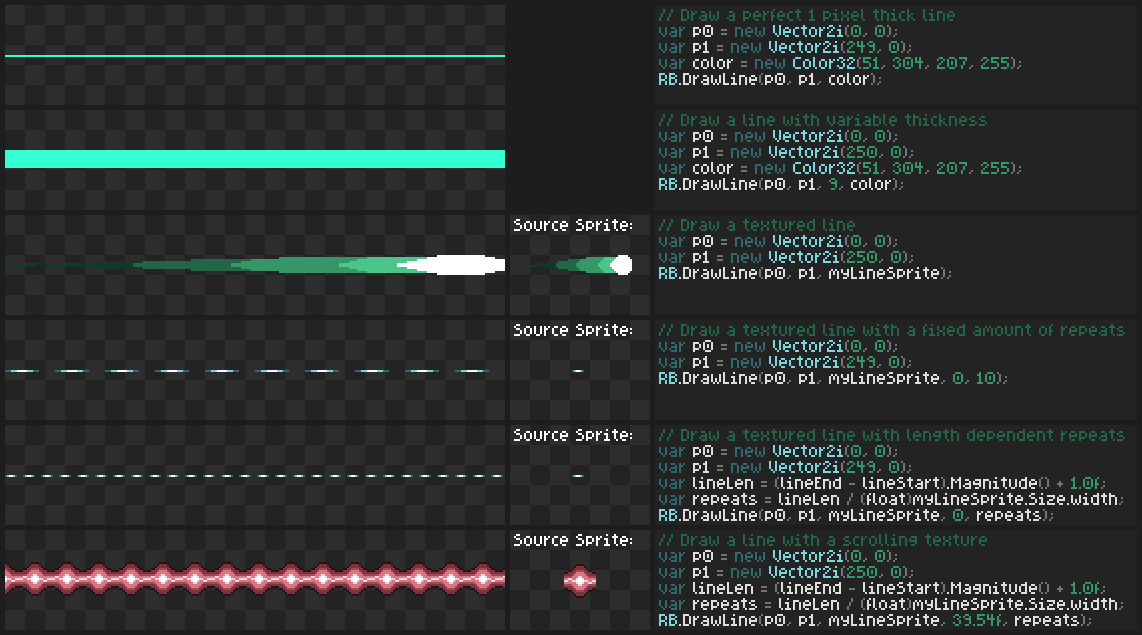 To draw thick solid lines use the RB.DrawLine overload that takes in an integer thickness parameter. For example:
Drawing a textured line is simple as well. Just pass in a sprite you want to use for the texture. The sprite can be defined as a Rect2i, a sprite name, a PackedSpriteID, or PackedSprite. The line texture will be repeated horizontally, so make sure that the source sprite is in a horizontal orientation for best results.
You can animate the line texture by changing the scroll parameter to scroll it horizontally. This parameter is a float, a value of 0.5f will scroll the texture halfway. Values bigger than 1.0f are also valid, the texture will just wrap around multiple times, for example 3050.25f is equivalent to 0.25f.
You can also change how many times a line repeats along the length of the line. Sometimes you may only want it to repeat once to draw a single texture, other times you may want to repeat it a fixed amount of times. Yet other times you may want to repeat the line based on how long it is to keep a consistent length of each texture segment. The repeat variable is a float, it is valid to pass a value such as 1.5f to repeat the texture 1.5 times.
Pixel BuffersWith RetroBlit you can draw your own pixel buffers to display (or offscreen surface). The pixel buffers are simply your own arrays of Color32 values. Drawing pixel buffers is vastly faster than drawing an equivalent amount of individual pixels via RB.DrawPixel. This can have several uses such as special effects, or drawing mini-maps. To draw a pixel buffer simply define your array of pixels and then call RB.DrawPixelBuffer to pass RetroBlit the pixel array and tell it what the dimensions of the pixel buffer are.
That's it, simple! Note that in this example we are calling RB.DrawPixelBuffer twice without changing the contents of the pixel buffer. In such a case you should pass the RB.PIXEL_BUFFER_UNCHANGED flag to let RetroBlit know that it does not have to re-upload the pixel buffer to the GPU. FontsPixel font rendering is also easy to do with RetroBlit. Built-in RetroBlit FontFor simple cases, or for development purposes you can print text with the built-in RetroBlit font right out of the box:
 The built-in system font supports a variety of Unicode characters, see Built-in System Font. Custom FontDefining custom pixel font is also easy. You have to provide RetroBlit with two pieces of information, the characters the font contains, and where to get glyphs for each character. You can define which characters a font contains with range of unicode characters by providing the first and last unicode character. This requires that the font contains all characters in the range with no gaps. You may also provide a list of characters in a List. This list does not need to be in any particular order, and can contain gaps in the character set. If a character list contains duplicate characters only the last duplicate will be considered. The glyphs can be provided as a grid in a sprite sheet, or as a List of sprites in a sprite pack. The order of the glyphs in the grid, or in the List must match the order of the supported characters specified by the unicode range or List of characters. In this example the font appears in the sprite sheet starting at position 0, 16. Each glyph is 12x12 pixels in size. The grid is 10 columns wide. The first Unicode character is A and the last is Z. The font in this sprite sheet can be setup like this:
This will setup the font with the parameters shown in the sprite sheet above. Additionally we specify that character spacing is 1 pixel and line spacing is 2 pixels, and that this is not a mono-spaced font. You can also use a sprite pack to setup your font:
Here we setup a font using a list of supported characters, and a list glyph sprites, rather than using a unicode range and specifying a sprite sheet region containing glyphs. Note that all the glyph sprites have to be in the same order as the supported characters, and all the glyph sprites must be the same size. Once setup we can print with this font just as easily as with the built-in font, adding only the font index.
 Note that the exclamation mark "!" did not render because it was not part of the font as it was defined, unsupported glyphs are shown as empty spaces. Inline String ColoringAs shown above you can specify which color to print with, and you can also specify inline color changes in your text string!
 The syntax for inline color changes is @RRGGBB where RRGGBB are 2 digit hex color codes between 00 and FF for the red, green, and blue color channels. Additionally you may revert the color back to the color originally specified in the RB.Print parameters by using the sequence @-. In this example the original color was Color32(255, 255, 255, 255). To print the @ character you can use the sequence @@. Sometimes it may be advantageous to ignore inline color changes, for example you might want to use the same string to print your text, and to print its drop shadow. For this use the flag RB.NO_INLINE_COLOR
 Inline Font EffectsRetroBlit also has two inline font effects, a wavy text effect, and a shaky text effect! Wavy text effect syntax uses the format w### where the 3 digits are each 0-9 values which correspond to wave amplitude, period, and speed. The default value is w000 which indicates no waviness at all. The shaky effect syntax uses the format s# where the digit is a value between 0-9 that indicates the magnitude of the shake. The default value is s0, no shake.
 Note that RB.PrintMeasure ignores font effects for the purpose of measuring the bounding area of a text string. The measurements will be done as if the font effects were not applied at all. Inline Font ChangesRetroBlit also allows you to change the font face inline! The syntax for font changes is simply @g## where the number represents the two digit font index of your font. The default setting is @g99, where the special value 99 refers to built-in RetroBlit system font. For this to work you will first have to setup your font indices so RetroBlit know which font index represents which font asset:
Now you can refer to the font indices inline with:
 When changing font inline the new font must have glyphs of the same height as the previous font, but the widths may vary. Text AlignmentInstead of specifying a position at which to print text you can instead specify a rectangular region to place the text in, and apply text alignment. For example:
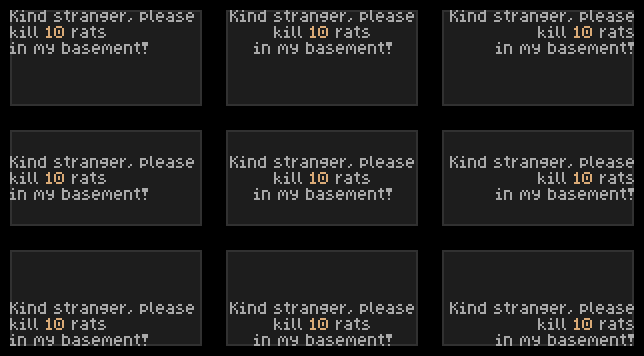 Different combinations of the flags RB.ALIGN_H_LEFT, RB.ALIGN_H_CENTER, RB.ALIGN_H_RIGHT, RB.ALIGN_V_TOP, RB.ALIGN_V_CENTER, RB.ALIGN_V_BOTTOM. Text ClippingIf you specify a rectangular text area then you may also want to specify how the text will behave if it does not fit in the rectangular area. You could just let it overflow beyond the rectangular area, you could clip it, or use automatic text wrapping. For example:
TilemapsRetroBlit supports orthogonal tilemaps with multiple layers. Each tile in a tilemap layer is the same size as its sprite sheets sprite size. The tilemap has a few other configurable parameters that can be set in RB.IRetroBlitGame.QueryHardware:
RB.HardwareSettings.MapSize is the maximum size of a single tilemap layer, and RB.HardwareSettings.MapLayers defines the total amount of layers that the tilemap supports. Ideally you should keep these numbers close to the minimum requirement for your game, to conserve system memory. RetroBlit internally optimizes tilemaps into Mesh chunks to minimize the amount of draw calls to the GPU. You don't have to worry about what that means, you just need to know that using tilemaps is far more efficient than drawing individual tiles by hand using RB.DrawSprite. DrawingTilemaps are drawn one layer at a time, giving you control of where and when each layer is drawn. This allows you to easily layer other drawing commands between the layers of the tilemap. For example:
This code draws tilemap layer 0 first, then draws a sprite at position 100, 100, and then draws tilemap layer 1 on top of the sprite. 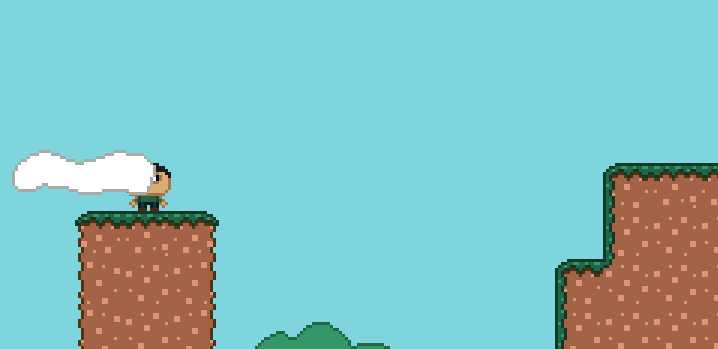 Changing Layer Sprite SheetEach tilemap lay has to be told which SpriteSheetAsset to use. You can change this sprite sheet at any time like so:
In this example we set the tile map layer 0 to use sprite sheet *sheetOtherTiles*. Note that if the new sprite sheet has different sized SpriteGrid than the previous sprite sheet then this layer's tiles will be resized to fit the new sprites. Setting or Getting Tile InfoYou can change the content of a tilemap at run-time. For example:
This code sets the tile at position 4, 8 in tilemap layer 0 to use sprite at index 0. It also sets the data object for layer 1, at position 4, 8 to be myStructInstance. What's a data object? It's anything you want it to be, or nothing at all. For example if you're developing a dungeon crawler you may want the data object to contain the collision flags for this tile, and a list of items that may be laying on the ground. Likewise you can read back the parameters you've set for your tile:
Tilemaps also work with sprite packs! You can set tile map sprites by using packed sprite names:
Tiled TMX SupportRetroBlit has support for loading orthogonal tilemaps from a Tiled .tmx file. When the RetroBlit editor extension script sees a .tmx file it will import it into its own binary format that it can very quickly load at runtime. If you encounter .tmx loading issues please try to re-import your .tmx file in case something has gone wrong during the .tmx to binary format conversion. As with other resources the .tmx files (and any accompanying .tsx and .tx files) should be located under a Resources folder. For other asset loading options see Asynchronous Asset Loading. Loading a TMX Map LayerLoading a TMX map layer is very simple:
This code first loads the TMX Map definition with TMXMapAsset.Load, and then it loads map layer named Ground Layer using TMXMapAsset.LoadLayer into RetroBlit tilemap layer 0. Notice that as with other resources the file extension of the TMX map is omitted. You must also specify which sprite sheet the loaded map layer should use with RB.MapLayerSpriteSheetSet. You can change the sprite sheet at any time, for example, you might have different sprite sheets for different seasons of the year. RetroBlit only supports a single sprite sheet per tile layer. Loading a TMX Map Layer with Sprite PackYou can also load a TMX map layer using a sprite pack. TMX file format refers to tiles by their tile id/index, so in order to convert these tiles into packed sprite names you will have to provide a lookup table to TMXMapAsset.LoadLayer. These lookup tables allow you to use a normal tile sprite sheet for working with Tiled, and a packed sprite sheet when loading the sprite pack with RetroBlit.
Here we load the TMX layer as before, but now when RetroBlit loads a TMX tile with the ID 0 it will replace it with the Dirt packed sprite, and when it loads one with ID 3 it will replace it with Water. Load TMX Object LayersRetroBlit also supports loading of TMX object layers! You can use this feature to define various objects in Tiled and to mark areas of interest on your tilemap. For example you could use objects to specify spawn location of enemies, secret areas, force fields, or whatever else can be defined as a shape! Loading these shapes is also very easy:
RetroBlit supports the following TMX object shapes: Reading TMX PropertiesTMX properties are also supported, in their various forms. You can read built-in properties such as layer dimensions, offsets, opacity and more. As well as custom properties on the map, layers, object groups, objects, and tiles!
Built-in and custom properties are straight forward. Tile properties are a little different, in the Tiled TMX format all tiles of the same tile index share the same properties and RetroBlit allows you to get at those properties for any loaded tile using the RB.MapDataGet<TMXMapAsset.TMXProperties> method. TMX Infinite MapsRetroBlit also supports TMX infinite maps. Infinite maps are so called because they can be extremely large, to a point where they are practically infinite. A very large map can't be loaded into memory at once, not only because of it size, but also because of how long it would take to load. Moreover, the player will only be interacting with a small section of such a map at any one time, and so it would not be wise to try to load it all in at once. To get around this issue TMX format saves these maps in chunks. Each chunk is by default 16x16 tiles large, but these dimensions can be adjusted in both Tiled and RetroBlit. At runtime your game can figure out what chunks are important to the game at a particular moment, and load those chunks specifically like so:
If the player is scrolling around the map at some point he will scroll out of bounds of some of your currently loaded map chunks, and you will have to load new chunks to show to the player. To do this you could clear the entire map and load the new chunks in, but this is not optimal because chances are that the player only scrolled away from some of the loaded chunks, while others are still valid and should not have to be reloaded again. To help with this RetroBlit provides the RB.MapShiftChunks method. You can use this method to shift the loaded map by the given amount of chunks, in the given direction. It may help to think of this operation as an equivalent of shifting elements in a 2 dimensional array.
 This tilemap is shifted by calling RB.MapShiftChunks. 8 of the original chunks are preserved, 7 new chunks become vacant and are loaded from the TMX map using RB.MapLoadTMXLayerChunk. Color TintingRetroBlit allows you to set a *tint* color while rendering which will mix your sprite colors with the tint color.
 Alpha TransparencyRB.AlphaSet can be used to set alpha transparency that applies to all drawing that follows until alpha is set again, or RB.IRetroBlitGame.Render exits. 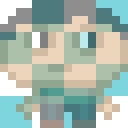
Clip RegionSometimes you may want to restrict which region of the display RetroBlit is allowed to draw to. We call this the clipping region, and with RetroBlit you can set it with:
In this example the clip region is set to the upper left 8 by 8 pixel rectangle, and so the following RB.DrawSprite call will only draw a portion of the sprite to the display. The clip region remains in effect for all following draw calls until the RB.IRetroBlitGame.Render method exits, or until it is changed again. Here is another example in action: 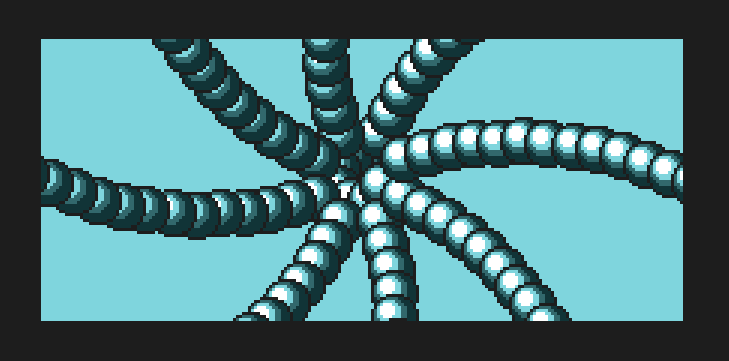 The blue area is in the clip region, the dark gray area is outside the clip region. Clip Region DebuggingIt can be difficult to debug rendering issues with clip regions. You may sometimes be unsure if your sprite is rendering at all, or if the clip region is in the wrong place. The RB.ClipDebugEnable and RB.ClipDebugDisable methods can assist with these types of issues. Drawing into a Sprite SheetIt can be occasionally useful to be able to draw to into a sprite sheet (also called offscreen rendering), and then copy all, or parts of this sprite sheet to the display. You can draw into any sprite sheet that you've loaded, or you can create a new blank sprite sheet to draw into. You can even copy from one sprite sheet to another.
This example first switches rendering to a sprite sheet with the RB.Offscreen method. Next it clears the sprite sheet surface, and draws a large text string to the sprite sheet surface. Once done the example then switches back to drawing on the display with the RB.Onscreen method. Finally it copies a 256 by 256 pixel area from the sprite sheet surface to the display, flipping it horizontally in the process, because why not? Note that you do not need to clear the sprite sheet surface on every update. In this example we could have drawn the text on the sprite sheet surface and left it there for subsequent RB.IRetroBlitGame.Render calls to copy from. If the text was sufficiently long enough then this could result in significant performance gains because RetroBlit would no longer be rendering the text glyph by glyph ever frame, but instead it would copy it as a single rectangular region. 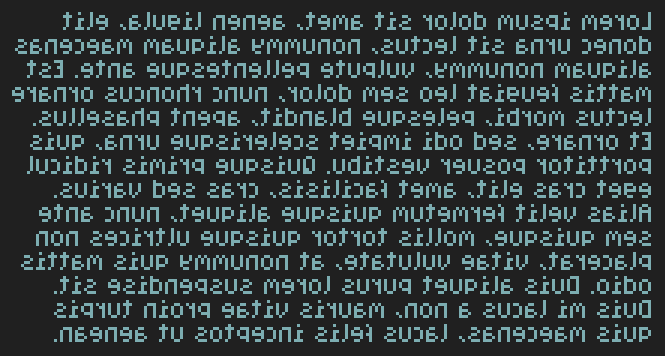 Here we have everyones favourite placeholder text "Lorem ipsum" printed on a sprite sheet surface, and rendered to display, flipped horizontally. When you no longer need a sprite sheet you can free up it's resources by calling RB.SpriteSheetDelete. Animating by Drawing into a Sprite SheetOne neat use of the ability to draw into a sprite sheet is global animation. You could animate sprites by drawing over them in the sprite sheet and the change would be immediately reflected anywhere the sprite is then drawn. For example you could animate the water in your tilemap by changing the water tile sprite each frame. CameraRetroBlit supports a concept of a very simple 2D camera. All drawing with RetroBlit is simply offset by the camera position. By default the camera position is 0, 0, so you may have not even realized there is a concept of a camera if you haven't used it. While simple, this camera can be extremely useful when your game has a scrolling play area.
Here we draw a sprite at position 0, 0, but because the camera has moved 32 pixels to the left the sprite will actually be draw at position 32, 0 on the display.  Moving camera to the left shifts everything on the display to the right, this image should help visualize how that works. Post-Processing EffectsPost-Processing effect are a mixed bag of rendering effects that can be applied to the entire display after the RB.IRetroBlitGame.Render method exits. It's up to you how you want to use these effects, if at all.
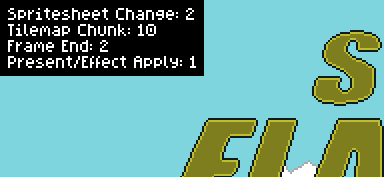
This example applies a subtle retro CRT scanline effect to your display. You can layer multiple effects together by setting them one by one. There are a bunch of other effects, have a look at all of them in the RB.Effect documentation, or better yet check out the DemoReel.cs demo for a live preview of all the available effects. 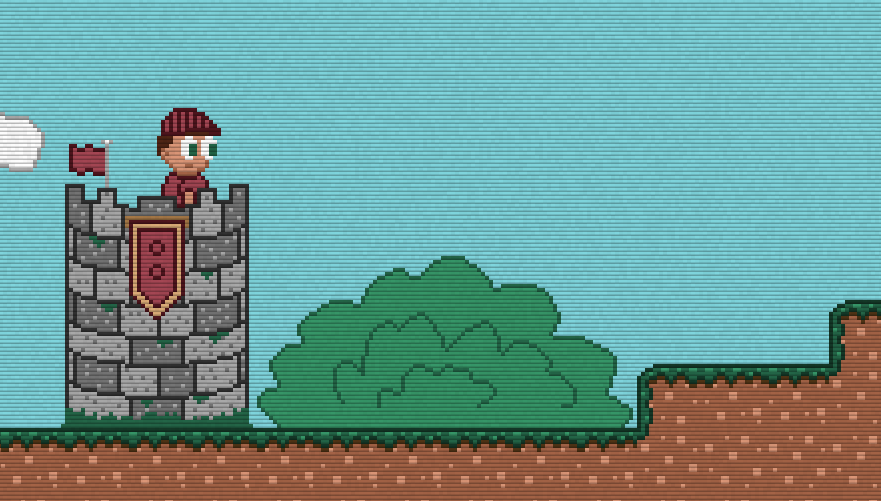 Super Flag Run demo game uses Scanlines and Noise effects to give a bit more grit and retroness. Post-Processing EarlyNormally post-processing effects are applied at the end of the render frame. In practice this means that everything you draw to the screen will have the same post-processing effects applied. There are scenarios where this might be undesirable. For example you may want to apply a RB.Effect.Scanlines and RB.Effect.Shake effects to your game scene, but only RB.Effect.Scanlines to your GUI. To achieve this you may use the RB.EffectApplyNow method to tell RetroBlit to immediately apply post-processing effects, and then let you continue to draw on top of them!
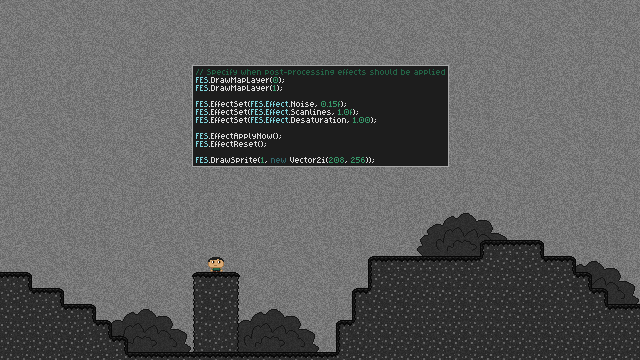 Noise and desaturation effect applied to the game scene, but not to the character nor the text field. Taking Over The DisplayFor even more control over how your game is displayed you can take over the game rendering surface and render it in a Unity scene in any way you want! To do this you simply get the rendering surface Texture using RB.DisplaySurface, and apply it to some object in your Unity scene. You will also want to tell RetroBlit to stop running its own presentation code by calling RB.PresentDisable. 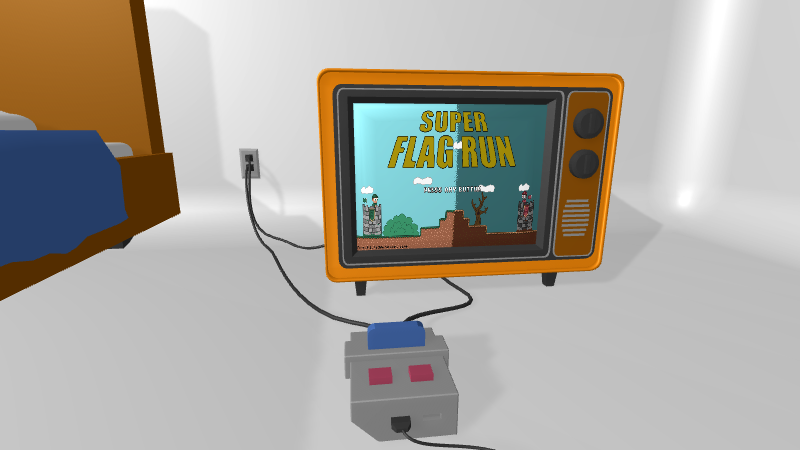 Super Flag Run demo game running in a custom scene. Have a look at the OldDays demo to see this in action. Shaders (Advanced Topic)RetroBlit supports custom shaders when drawing, and when applying Post-Processing. Shaders can be very powerful, and enable all sorts of potential for custom effect. However shaders can be intimidating for new game developers and are considered a more advanced topic. Nonetheless RetroBlit strives to make shaders as simple as possible, and there are troves of general shader tutorials available online! Loading a ShaderShaders are loaded just like all other RetroBlit resources, with ShaderAsset.Load. If you're familiar with Unity you may be wondering where Materials come in to play, well they don't, RetroBlit will take care of that for you! Unity stores shaders like resources, each shader has a .shader extension and should live somewhere under a Resources folder. For other asset loading options see Asynchronous Asset Loading.
Enabling a ShaderOnce a shader is loaded you can enable it for rendering with a simple call to RB.ShaderSet. The shader will then by applied to all subsequent drawing operations, until a different shader is set, RB.ShaderReset is called, or the frame ends.
This example assumes that the shader loaded into index 0 has a global property named Wave. The first sprite is rendered with the Wave property set to Mathf.Sinf(t), and the second sprite is rendered with the Wave property set to 0. You may be wondering what the RB.ShaderApplyNow call is all about. If that call was taken out the first sprite would be rendered with the Wave property set to 0 as well! This is because sprites are not rendered immediately but are batched for later rendering. If the value of the Wave property changes between the time RB.DrawSprite is called and when it is actually rendered then only the most recent value of the Wave property will be used. RB.ShaderApplyNow flushes any batched sprites immediately, ensuring they use the most recently set shader property values at that time that RB.ShaderApplyNow is called. Ideally you will want to limit how many times you call RB.ShaderApplyNow or switch shaders, because each time that you do you will interrupt a sprite batch and cause a flush of the rendering pipeline, which reduces performance. For optimal performance consider using ShaderAsset.PropertyID to prefetch shader property IDs, instead of passing them as strings. For example:
Sprite Sheets in ShadersMany shaders will want to access (known as sampling) the pixels of more than one sprite sheet. This can be done using the ShaderAsset.SpriteSheetTextureSet method in which you can pass the sprite sheet. You may also use ShaderAsset.SpriteSheetFilterSet to specify how the sprite sheet should be sampled, either using the default RB.Filter.Nearest, or RB.Filter.Linear which interpolates pixels colors based on neighbouring pixels.
Writing a RetroBlit ShaderCustom shaders in RetroBlit should build on top of existing RetroBlit Shaders because RetroBlit internals still need to be satisfied by your shaders as well. Refer to the table below for suggestions on which shader to base your custom shader on.
The shaders are documented, and make suggestions on where you should add your custom shader source, and properties. For an example of custom shaders please have a look at the DemoReel example! Below is a shader from the DemoReel example that creates a masking and wavy effect. The meat of the code is in the section commented with: /*** Insert custom fragment shader code here ***/ The properties Wave and Mask used by this shader were added to the section: /*** Insert custom shader properties here ***/
Sprite UV CoordinatesThe vert_in and frag_in structures define multiple UV coordinates, namely uv, spritesheet_uv1 and spritesheet_uv2. Understanding what these coordinates refer to can help with writing custom shaders where UV coordinates are required. 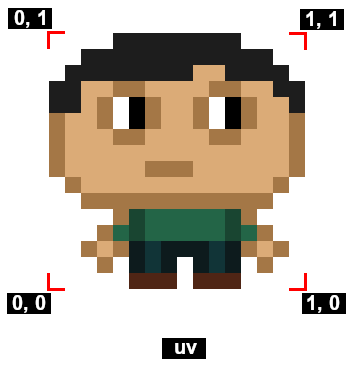 uv is the coordinates of the sprite, they range from 0.0, 0.0 (bottom left corner), to 1.0, 1.0 (top left corner). These coordinates are interpolated for each pixel of the sprite being drawn. 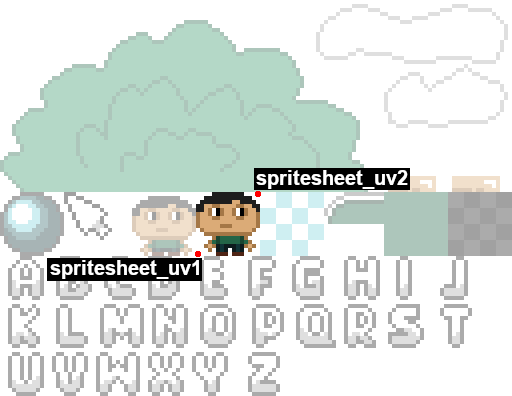 spritesheet_uv1 (bottom left corner), and spritesheet_uv2 (top right corner) are the coordinates of the sprite within its sprite sheet. These coordinates are static, and do not interpolate for each pixel of the sprite being drawn. The RetroBlit shaders use these two sets of coordinates to map uv sprite coordinates to the sprite sheet using the map_uv() function in the shader. The benefit of this approach is that the sprite coordinates always range from 0, 0, to 1, 1 allowing for shader effects within the sprite space, rather than within some random sprite sheet space. Post-Processing ShadersShaders can also be used at the post-processing stage. These shaders are different in that they work in the native window resolution of your game, whereas the drawing shaders work in the RB.DisplaySize resolution of your game. For post-processing shaders you will still use many of the same shader methods, but you set the post processing effect shader like this:
Note that custom post processing shaders bypass many of the built-in RetroBlit post processing effects, and so only the following effects will continue to work while a custom post processing shader is active:
At any time you can revert back to built-in shaders by calling the RB.EffectReset method.  Custom post processing shader with a ripple effect. Shader LimitationsNot everything is possible with RetroBlit shaders. RetroBlit still manages your vertex data for you, so you will not be able to send any custom vertex data to the vertex shader. Batch and Flush DebuggingSometimes it can be useful to understand how many GPU draw operations are being performed by RetroBlit in the background, and why. Unity already lets you see how many draw batches are being used, but RetroBlit can further break down the batches into groups. To enable this feature simply call RB.BatchDebugEnable and give it the font and background colors to use while rendering this information:
 Asynchronous Asset LoadingIn the above examples we have only covered using RetroBlit to load assets synchronously, meaning that each asset Load method blocks until the asset is loaded before returning control to your game. It is also possible to load assets asynchronously without blocking the execution of your game. Asynchronous loading is preferred in most cases as it doesn't lock up the game, and so allows for creation of animated loading screen and for loading and unloading assets during game play, as needed. There are multiple types of asynchronous asset loading sources: asynchronous resources, WWW urls, and Addressable Assets. In each case calling Load returns immediately while the asset continues to load in the background. You can monitor the asset loading progress by inspecting the status member of your asset, or by providing an event method that will be invoked when the asset finishes loading, successfully or not. Asynchronous ResourcesPrevious examples have loaded assets from Resources folders in a synchronous way. These same assets can be loaded asynchronously as well!
Alternatively you can use an event method to be notified when the asset finishes loading.
If an asset fails to load the asset status will be RB.AssetStatus.Failed, in such a case you can also check the asset error to get a reason for the failure. WWWLoading WWW resources is necessarily asynchronous since it may take a long time, depending on your connection speed. There are some other exceptions to WWW resources:
If an asset fails to load the asset status will be RB.AssetStatus.Failed, in such a case you can also check the asset error to get a reason for the failure. For WWW assets the error may include network errors. Addressable AssetsAddressable Assets are the newest way of managing assets in Unity, and they replace the now deprecated Asset Bundles. This new system for managing assets is very powerful, but also the most tricky to setup and work with. You may want to browser Unity reference on Addressable Assets to gain a greater understanding of them. Addressable Assets are not included in Unity projects by default, the Addressable Assets package must be added through the package manager. When the Addressable Assets package to install it is highly recommended to install the version marked as verified for your particular Unity version. 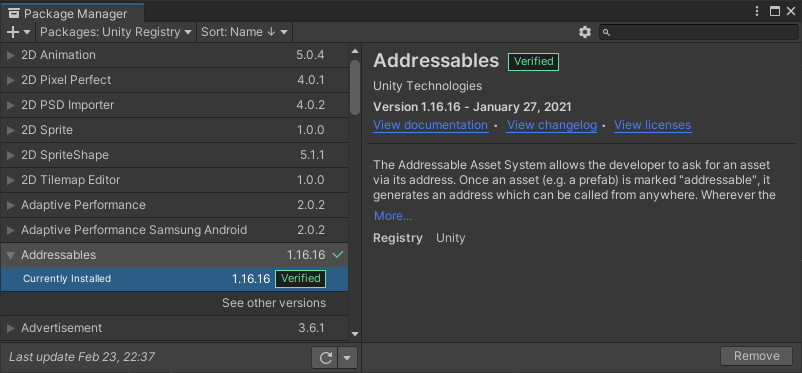 Unity can sometimes get confused with package references. If you get strange compilation errors after including Addressable Assets package then please close Unity, delete the .vs folder in the root of your project and restart Unity. This will force Unity to regenerate the project files and fix any Addressable Assets related compilation issue you might be seeing. Now you are ready to define your Addressable Assets. This can be done under Window -> Asset Management -> Addressable -> Groups. You can define your asset groups here, and drag your assets from the project explorer into these groups. By default Unity will then generate asset references and name them for you. These names tend to be a little long, and it might be a good idea to select the newly imported assets, right click, and select Simplify Addressable Names. 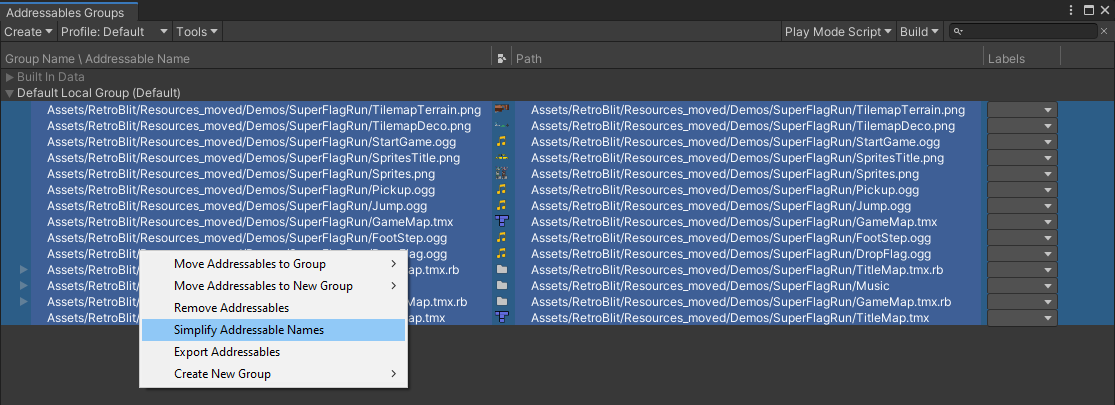 Finally for RetroBlit complex asset types such as TMX Tilemaps, and Sprite Packs it is important to make sure those asset names end with the .rb extension, and that their child folder structure is not changed so that RetroBlit can find all the necessary parts of the asset when it's loading it. 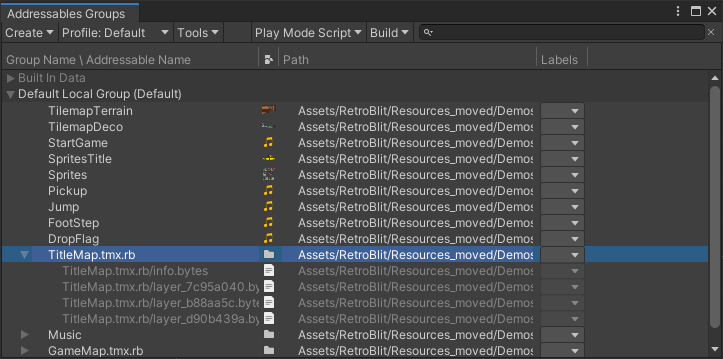 Now you're ready to use Addressable Assets!
If an asset fails to load the asset status will be RB.AssetStatus.Failed, in such a case you can also check the asset error to get a reason for the failure. Custom Asset LoadingRetroBlit allows you to bring your own assets and load them into RetroBlit assets. This could be useful if you need to do something unusual with assets, or if none of the RetroBlit loading functions fit just right. To use your own asset simply pass it to one of the RetroBlit asset Load methods.
The above code uses an existing Texture2D to setup a SpriteSheetAsset. The same can be done with AudioAsset and ShaderAsset. However, it is not possible to load TMX Map assets, or Sprite Packs this way because those assets are more complex and require additional definition and lookup files that only RetroBlit understands. InterpolationRetroBlit provides an interpolation method that allows you to interpolate values like numbers, colors, vectors and more using 30 different interpolation curves. These interpolations can enable you to create smoother animations. Values are interpolated on a time scale of 0.0 to 1.0, an example:
 Visualization of all the different interpolation curves supported by RetroBlit. AudioRetroBlit makes playing audio also trivial. You can have a variety of sound effects playing, and a single music track playing at the same time. SoundFirst step of playing a sound is loading the sound asset.
As with other resources sound files must be located somewhere in your Assets under a Resources folder. For other asset loading options see Asynchronous Asset Loading. Now you can play the sound like this:
This example plays the sound we setup at 75% volume level, and at 125% pitch. RB.SoundPlay also returns a SoundReference. While the sound is still playing you can use the sound reference to change its volume, it's pitch, it's looping mode, and you can use it to stop the sound. Once the sound stops the SoundReference is no longer valid and can be disposed of. You can check if the sound is still playing using the RB.SoundIsPlaying method.
When you no longer need a sound clip you can free up resources by calling AudioAsset.Unload. Sound PriorityWhen playing a sound with RB.SoundPlay you can specify the priority of the sound. If there are more sounds playing than RetroBlit can handle then any sound with a lower priority will be stopped, and the new sound of higher priority will play. If all playing sounds are of higher priority then the new sound will not play. The priority is specified as an integer, and can be of any value.
Spatial SoundBy default RetroBlit plays sounds with no spatial processing. Sounds play at exactly the given volume with no regard for how far they may be from the player. However, RetroBlit also supports spatial 2D sounds that will change in volume and direction depending on where they are located in respect to the listener. To set up spatial sounds RetroBlit needs to be told where the listener is positioned with RB.SoundListenerPosSet, and the position of each sound that you want to spatially position with RB.SoundPosSet. RB.SoundListenerPosSet has no effect on sounds that don't have their position set.
AudioSource AccessFinally, RetroBlit lets you retrieve the Unity AudioSource object of a playing sound for more advanced sound configuration that is not directly supported by RetroBlit.
You can get an overview of the options exposed by AudioSource by looking at the contents of one of the audio channels in the Unity scene graph under RetroBlit/RetroBlitAudio/RetroBlitAudioChannel#. MusicMusic works much like sounds, with the exception that there is only ever one music track playing, and so there is no need for an equivalent of SoundReference.
If you play a new music track while the old one is still playing then RetroBlit will smoothly cross-fade the music for you. You can further control the type of cross-fade that is done with RB.MusicCrossFadeSet:
The above code sets up to music fade to look like this: 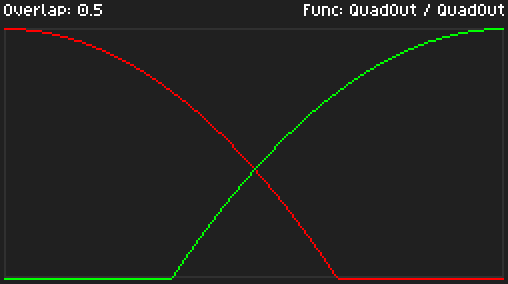 Red line represents the volume of previously playing music track that is fading out, and green represents the new track fading in. As with sounds, when you no longer need a music track you can free up resources by calling AudioAsset.Unload. InputRetroBlit simplifies input handling a little bit. You're of course free to use your own input handling with Unity's existing Input class, but hopefully you'll find RetroBlit input a little more approachable. While you can mix Unity Input handling with RetroBlit Input handling in general there is one caveat to be aware of. RetroBlit calls RB.IRetroBlitGame.Update at a fixed rate, and in the back end this behaviour relies on MonoBehaviour.FixedUpdate. As you may already know it is not advisable to call UnityEngine.Input.GetKeyDown and UnityEngine.Input.GetKeyUp inside of MonoBehaviour.FixedUpdate because these input events could happen in-between fixed updates, and will be missed entirely. RetroBlit provides it's own Input methods to handle this issue. GamepadsGamepad handling is especially easy with RetroBlit. Take a look at this:
Button codes like RB.BTN_A are bitmasks in RetroBlit, so you can logically OR them together. In this case the if statement is true if either player one or player two released either button A or button B since the last call to RB.IRetroBlitGame.Update. Gamepad Input OverrideRetroBlit maps Player One and Player Two gamepads to keyboard strokes so gamepads are not necessary for these players. Player Three and Player Four are not mapped to the keyboard. By default the keyboard mapping is such that on standard sized keyboard two people should be able to play at the same time. Beware though that an average PC keyboard only supports 4 simultaneous key presses, some better keyboards support 6, and fancy gaming keyboards can sometimes support 7+. Some modifier keys like KeyCode.LeftShift can be exempted from these rules, but in the end it's all up to the manufacturer, and how much money they tried to save on the wiring/traces of their keyboard. 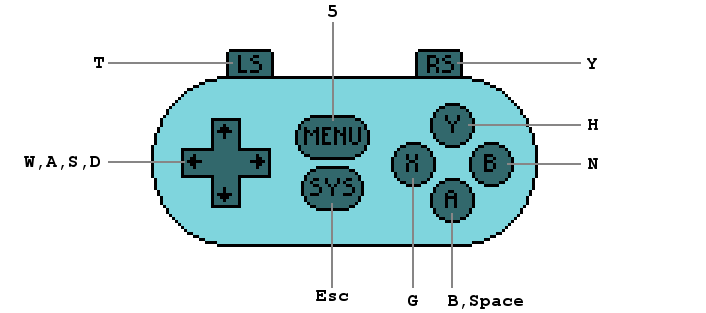 Player one gamepad keyboard mapping. 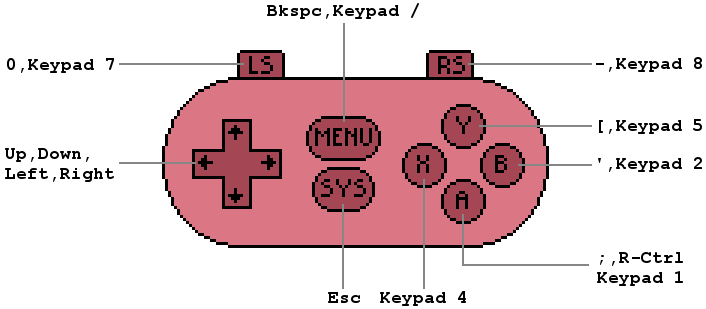 Player two gamepad keyboard mapping. If you don't like this mapping you can easily provide your own keyboard mapping through the RB.InputOverrideMethod delegate, like this:
In this example we remap RB.BTN_A for RB.PLAYER_ONE to the KeyCode.LeftControl key. First we tell RetroBlit about our override method with the call to RB.InputOverride. Next when RetroBlit calls MyOverrideMethod we check which button it's looking for, and for which player. If it's RB.BTN_A for RB.PLAYER_ONE, and the key KeyCode.LeftControl is pressed then we return true to indicate that RB.BTN_A is pressed, otherwise we return false. We also need to set the handled out variable to indicate whether we handled this button ourselves or if we want to fall back on the RetroBlit default mapping. KeyboardThe keyboard API is straight-forward, and similar to the UnityEngine.Input APIs. For example:
This code should be self explanatory, the only interesting part is the last line. The RB.InputString method returns the string typed since last frame. Usually this will only contain 0-1 characters, but if the user is typing very quickly it may contain more. You may think that you could achieve the same functionality if you just check every KeyCode and add it to myInputStr if it's pressed. Consider what would happen if the user is typing quickly and they pressed both the A and B keys in the last frame. How would you know if they meant to type AB or BA? You can't know, but RB.InputString does! PointerThe pointer input represents either mouse input, or touch screen input (single touch only). It's simple really:
That's easy enough, and will work well for a mouse. However, what happens if the user is on the touch screen device, and is not even touching the screen? The position would not be valid. You can check if it's valid like this:
Finally you may find it handy to check the vertical scroll wheel movement since last update:
RB.PointerScrollDelta returns the scroll direction and magnitude since last RB.IRetroBlitGame.Update. If the scroll wheel is not being scrolled or there is no mouse at all then 0 is returned. Multi-touch SupportRetroBlit also supports multi-touch, with tracking of up to 4 touch points. There is no need to do anything special to use multi-touch, simply pass the index of the touch position you'd like to query with RB.PointerPos, and to test if a finger is up or down you can use RB.ButtonDown, RB.ButtonPressed, and RB.ButtonReleased with the buttons RB.BTN_POINTER_A, RB.BTN_POINTER_B, RB.BTN_POINTER_C, and RB.BTN_POINTER_D.
Button and Key RepeatsRetroBlit also provides a convenient way to handle button/key repeats. This can be helpful if your game requires an action to repeat while the player is holding down a key or button. To make use of this feature simply pass the optional parameter repeatRate to these methods: The repeatRate parameter specifies the amount of frames that should pass between button/key repeats.
Garbage CollectionGarbage Collection is great for simplifying development in general, but for game development it has some undesired side effects. If a game generates significant amount of garbage per frame then stuttering and performance hiccups are inevitable. RetroBlit is very careful not to cause any unnecessary allocations, and it generates no garbage at all in a normal render frame, garbage is only generated when assets are created, loaded or modified in some way. To keep your game running smoothly you should also strive to generate as little garbage as possible. Knowing where your garbage is coming from is not always straight forward, but the Unity Profiler can be a fantastic tool for helping you locate your garbage. Learn more about the Profiler and Garbage Collection in general here: https://unity3d.com/learn/tutorials/topics/performance-optimization/optimizing-garbage-collection-unity-games String GCOne of the biggest and sneakiest Garbage Collection culprits is the string type. Almost all string manipulation causes C# to spew out garbage, if this happens every frame your garbage can quickly get out of hand. For example, this will cause 100 bytes of garbage every frame!
The code may look innocent but here is what happens behind the scenes.
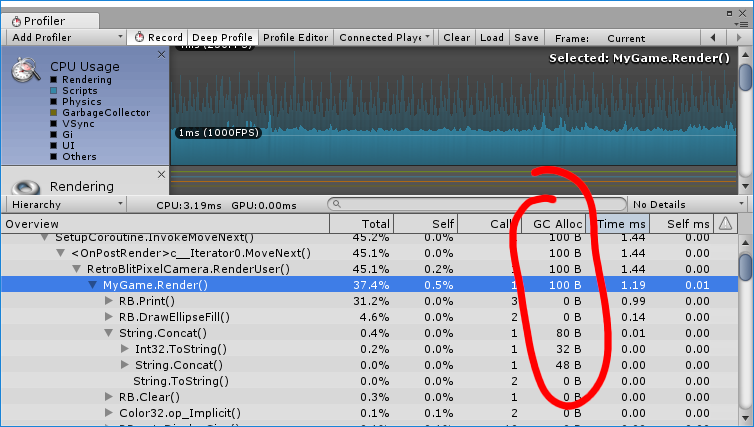 Unity Profiler does a great job showing where the garbage is generated! This result is obtained with .NET 3.5 on Unity 2017.1 running on Windows 10 64bit. Your results may vary slightly on your platform. Avoid GC with Fast StringTo combat the evils of string RetroBlit provides the class FastString, which generates no garbage! FastString preallocates memory for the string, and keeps reusing the same memory instead of discarding it and causing garbage.
In this code we have a preallocated a FastString that can store up to 128 characters, and instead of discarding it on every frame we call FastString.Clear to empty it out, and then a series of FastString.Append calls to fill in the new content. Every FastString method also returns that same instance of FastString so for convenience these calls could be chained together like this:
The result is no garbage generated at all! 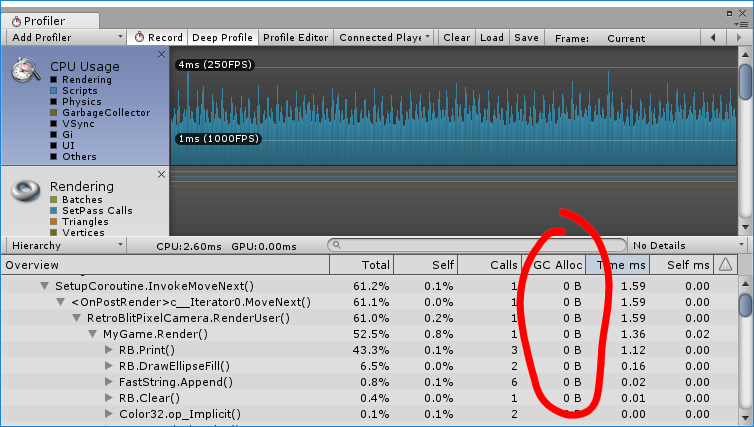 Zero garbage is a good thing. You could even reuse the same FastString object in the same frame, in fact, you may be able to get away with a single FastString object for all your disposable strings!
FastString overloads the FastString.Append method for various types like string, int, float, Color, Vector2 and more, and it also allows you to format your numbers:
When using FastString you could still fall for the evils of string, so be careful to not do something like this:
RB.Print method supports FastString, as well as string. Editor ExtensionsRetroBlit has three editor scripts that help with importing assets.
You may sometimes want RetroBlit to ignore certain assets and not run them through its editor scripts. To do that simply put these assets under a subfolder called RetroBlit-ignore. For example these texture assets will not be modified by RetroBlit:
Source Control Ignore ListWhen using source control you typically want to ignore some file types. At minimum it would be a good idea to ignore these files for RetroBlit.
The first few would apply to any Unity project. The tmx/tsx/tx ignores should be added to ignore RetroBlit specific conversion to binary format of those files, it's better to let RetroBlit regenerate the binary format of TMX files if the project is re-synced/cloned. Likewise sp.rb are generated sprite pack folders which are also better to ignore, and regenerate when the project is re-synced/cloned. Closing WordsThank you so much for your interest in RetroBlit. RetroBlit is a one mans quest to create the perfect retro framework for my own projects. Along the way I realized others may find it useful if I put in a bit more effort to make it presentable (it turned out to be a lot more effort!). I sincerely hope that you enjoy the framework, and that you create something fantastic with it! If you enjoyed RetroBlit and would like to continue supporting its development then please consider leaving your review on the Unity Asset Store! Feel free to contact me at: contact@badcastle.com |